With Sympathy Masculine Colors Card

Cards

Sending a sympathy card is usually done under pretty crummy circumstances, but acknowledging someone’s loss can be very meaningful. I designed this sympathy card in neutral, and what I would consider masculine, colors to really be a card you could send to anyone.

I started by picking out a few brownish-gray papers to layer and cut these down to size. Then I picked a stamp with the “With Sympathy” sentiment. I like the contrast of the swirly design and simple background together.

I decided to stamp in VersaMark and emboss with clear embossing powder. I love the way the embossing turned out. Adding the heat turned the clear powder a lovely darker shade of the tan paper, making it stand out, yet being understated at the same time.

If you need a sympathy card, you can pick up one of these in my Etsy shop, Sarcastic Squirrel.

Card for Wisdom Teeth Removal

Cards

A few days ago, my husband had his wisdom teeth removed. I think dental work is pretty anxiety-filled for most people, so I wanted to make something for him that would make him smile. Usually when I sit down to make a card I have an occasion or sentiment in mind, but 9 times out of 10 I have absolutely no idea what exactly I’m going to make. This time was no exception. And here’s the outcome!

I started out by creating a print and cut file in Silhouette Studio. I found the tooth vector on my favorite site for free graphics – pixabay. I added the little smiley faces because…these were happy teeth. I picked out a font for the “Farewell!” sentiment and sent all of these items to print and cut. Once I had all the pieces cut, I decided the teeth needed a little something. I drew the tiny halos in glue on some scrap paper and covered with gold glitter. When the glue had dried, I cut around the halos and arranged the card with all the pieces I had cut.

I needed an envelope and thought I would put a little decoration on it. I used the same tooth design and added the “RIP” text. I decided to use my Silhouette sketch pens to draw this design on the envelope.

Finally, and I don’t have a great picture of this, I used print and cut again on some sticker paper to create a sticker to hold the envelope closed. I used the tooth shape one more time, and this time added some angel wings to the tooth in Gimp.

I LOVE how this card turned out – it just cracks me up, and is the weirdest card I think I’ve ever made.

If you know someone having their wisdom teeth removed and want to send them a smile, you can find this card in my paper shop, Sarcastic Squirrel.

Have you ever made a card…for TEETH?! 😀

Thank You Card

Cards

Another card to share today, this time a thank you card.

I love this background stamp from Hero Arts and decided to spice it up a little bit by heat embossing with a glittery gold!

To tone down the shiny I used shades of red for the sentiment. The “Thank You” sentiment is stamped in red ink, then heat embossed with clear embossing powder. I left heat on the embossing powder longer than normal to give the finish a matte look instead of the shiny finish you typically get from heat embossing. This matte finish on the red cardstock makes a nice juxtaposition against the glittery background.

This was a nice, simple project for a card in a hurry. I will definitely be using this great background stamp again!

Boo!

Cards

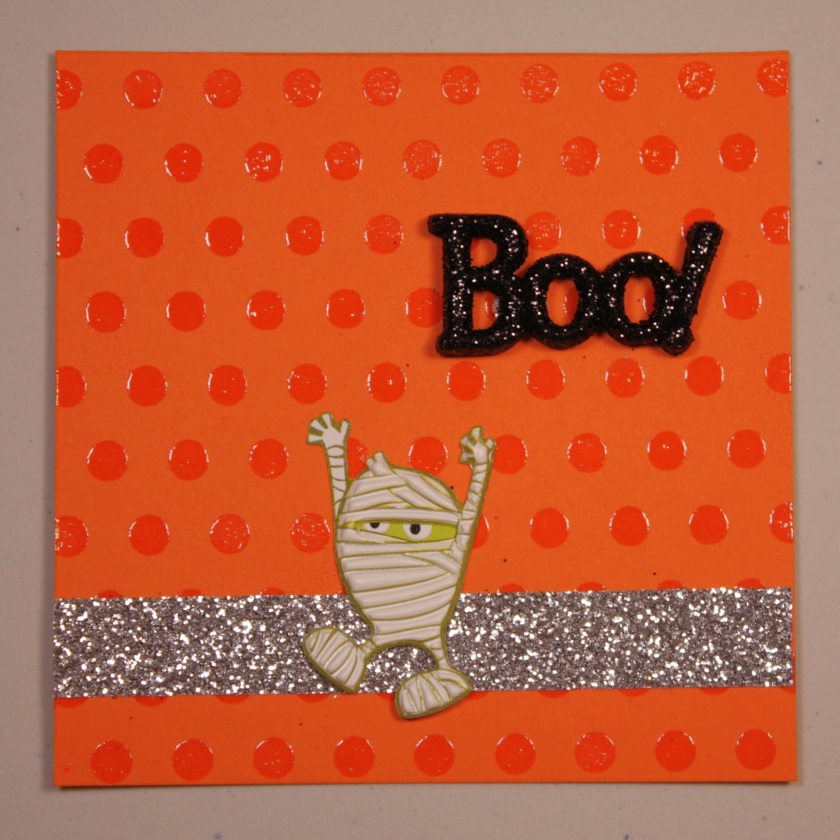
I love making these little 3″ x 3″ cards for sending quick notes or as gift tags. I’ve been working on making some for Halloween, and in the same spirit of yesterday’s post, I wanted to share this cute card!

I started by heat embossing the polka dot stamp using VersaMark and clear embossing powder, then adding the silver glitter tape (reinforced with some Tombow permanent tape adhesive), glittery Boo! sticker, and the cute mummy sticker.

This little mummy is probably my favorite sticker of all time.

BOO!

IMG_7491

Wedding Card for Cousin

Cards

Over the holiday weekend, I had the great opportunity to celebrate my cousin’s wedding. It was such a nice ceremony, and it’s always fun to see family at these types of events. I wanted to give them a little gift, including a card with a personal touch, so I put this together!

I really love how it turned out. I couldn’t find a sentiment I really liked in any of the craft stores near me, but I was able to find this great sentiment (“Your wedding day may come and go, but may your love forever grow”) on a cling stamp on Amazon and it arrived just in the nick of time Friday afternoon – we were leaving at 5AM Saturday morning!

Since it was for a wedding I wanted it to have an elegant look, so I chose the frilly background stamp and heat embossed with Ranger Liquid Platinum embossing powder. If you look closely, the swirls create a bit of a heart pattern that I also thought was wedding appropriate.

However, the wedding was a more casual affair, so I wanted the formality level of the card to match the event. I think the burlap bow and “raw” congratulations stamp on the front of the card give it that more rustic feel, without making it too casual.

As a finishing touch I added a pink embossed heart on the back. I used a Copic Multi Liner pen in Sepia to sign the card to go along with the other colors in the card.

Overall I was thrilled with how this turned out and I hope they really love it, too! Have you ever made a wedding card?

I Love You Awesome Nerds

Cards

I sat down at my desk last night, just to kind of mess around and see what came out of it. Well, I ended up with this card that is just cracking me up.

IMG_20150908_111003

I always love the combination of orange and blue since I went to the University of Illinois. Once I started painting the circuits I thought, “geez, this is really nerdy”. Did I mention I studied electrical engineering at U of I?

The “I love you awesome nerds” quote from Pitch Perfect popped into my head, and I thought it would be a great sentiment for the card.

Since I was already in Illini mode, of course I had to make the “I” in the sentiment the great block I that Illinois uses.

I absolutely love the way this turned out! What do you think?

I – L – L!

Colorful Bubble Glitter Embossed Thank You Card

Cards

I have always loved stamping and making cards. Recently, I’ve become really interested in learning new card making methods, and wanted to share my first thank you card!

I recently had a birthday and wanted to thank my sister for the awesome gift she sent me. This is what I came up with!

I love using darker paper and a metallic or white gel pen to write my message inside.

Because I’m still feeling summery, with fall coming on strong, I wanted to keep this card colorful and bright. I used an embossing powder that was a black base with rainbow glitter to heat emboss the thank you’s. The glitter was a fun effect. I chose the red, green and blue bubble background paper to match the colors of the glitter in the embossing powder. I’m excited to create and share more cards in the future, and would really love to know what your favorite card making tips, tricks and methods are!